21 Wash-and-Wear Haircuts for Women Over 60
Decide how much time you want to spend on your hair before you agree to a cut. Tell the stylist what you do on a normal Tuesday, before they reach for a round brush.
The cuts below suit different air-dried textures. Wherever a shape needs a little more work, you’ll find the step it depends on.
1. Straight bob with a clean edge

Wear it at a point where the ends fall without a brush. Check the brow and nape with your head upright after drying.
The shape works best when the ends already dry straight across or bend in one direction. Bring a photo of the front after a wash and a second shot of the back.
If you see one side move outward when it reaches the jaw, ask to leave enough length to tuck that side on busy mornings. Keep a bit of length at whichever side you tend to tuck.
2. Tapered silver pixie

Use the shape of the nape as your guide when you choose a taper. If the growth turns sharply at the back, a softer edge can grow out without looking like a ledge.
Put the front where you want it while it’s damp and wait for it to cool before adding anything. A small amount of root lift can leave the top easy to reset.
Leave a little length at the front so you can direct it with wet fingers. Ask for a taper that follows how the back grows.
3. Air-dried wavy lob

Keep enough length for two bends to form. Squeeze water out with a smooth towel and leave the bends to set without combing.
The collarbone gives the last bend somewhere to turn. Keep longer pieces around your face if you want them out of your eyes without a clip.
If one bend goes flat as the top dries, try moving the part while wet and check where the ends land on the new side. Turn your head to see how the bigger bend falls over the shoulder.
4. Short coily crop
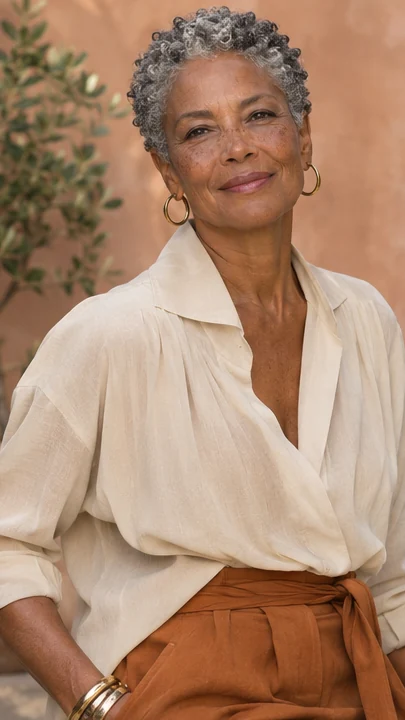
Choose the length on dry coils. If you refresh between washes, mist the flattened side and give it time to set before you put on a hat.
A rounded crop leaves the texture visible without asking you to set every small curl. Show the stylist where the coils shrink most near your part or nape.
A bit more length through that spot helps the dry outline sit closer to the one you chose in the mirror. Let the side near the ear dry before deciding if it sits close enough.
5. Wavy bixie

Keep the top long enough to make a bend and ask for an open outline at the ear. The wave can settle with a finger tuck.
Let the front bend in its usual direction and keep just enough length to get it behind one ear. A short back can still move if the crown has enough hair to lie loose.
Choose where you want it open with your glasses on before taking more off that side. A piece of wave at the brow gives you a place to set the part.
6. Below-the-jaw straight cut
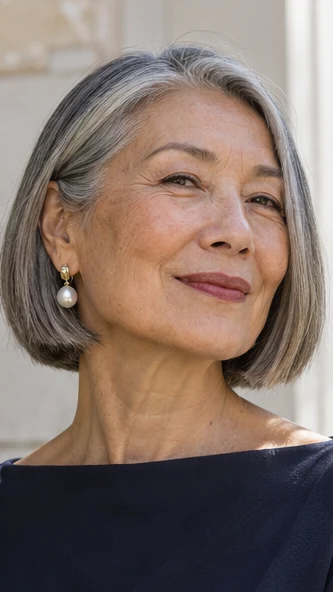
Try the new length over the shirt you wear most often. If the ends settle where you like without a brush, the cut will be easier to repeat after a wash.
Give a slippery side enough length to stay behind the ear when you tuck it and turn your head. Check its shape dry after you put your everyday frames back on.
Leave space below the jaw for a tuck. Salon note. This length works best if the ends dry in a direction you already like.
7. Shoulder cut with an intact bottom

A solid edge gives you length to tie back. Test it with your favorite collar, since the ends may flip where they hit fabric.
Leave the ends clear of the collar if you like them straight. A little extra length can help them fall past it instead.
Have a look from behind with the hair hanging loose and then put it into your usual low tie before choosing the final length at the sides. On a day without a tie, the bottom should still show as one edge.
8. Soft French bob with grown-out fringe

Leave the fringe long enough to push away from your eyes. A slightly longer front gives you time between fringe trims. Bring a picture showing the fringe on a regular morning.
The part may open at a different spot once the shorter layers have less weight. Keep enough hair at the front to sweep across without the section falling into your glasses as soon as you look down.
Bring your reading glasses too if their rims sit higher across your brows. Check the longer points as the roots dry.
9. Loose curl bob

Show your stylist how the curls fall on wash day. Leave enough length for them to coil through to the ends. A curl bob can dry into a soft outline if the bottom has room to form another loop.
Check where it clears the collar once dry. Let the shorter pieces settle beside your face before deciding where to add layers or how much curl you want near the brow. Shorter curls may open at the cheek while the longest ones clear your collar.
10. Tapered cut for a forward crown

Sit in the chair with a dry part so the stylist can see the spot where the crown changes direction. You can keep a little more there to help it lie down.
If you prefer to wear it forward, bring the ends over before deciding how low you want the fringe. Give the crown a moment to settle before you choose the last bit of length.
Comb the top forward while the hair is damp. If a cowlick points backward instead, use it as the part rather than fighting it.
11. Low rounded crop

A little hair around the temple lets you change the look with a tuck. Daylight check. Keep the bottom clear of an earring you wear every day.
The rounded edge in a low crop shows where the sides pass the ears. Let the short length end where you can still wear your everyday jewelry.
Run your hand around the back after a wash and see if you like the dry outline before asking to take it closer. A side view shows how much the cut opens around your earrings.
12. Brushed-forward pixie

Wet your fingers and work through the roots after a night on the pillow. The top needs enough length to lie down again.
Reset only the spot that flattened on the pillow. A few damp fingers can move the hair at the roots while the ends keep their shape.
If the top won’t sit down, leave that section a little longer next time and ask for less weight near the nape instead. Put a little length back into the plan if you keep pushing it through your fingers.
13. Long pixie with a loose part

Ask to keep the crown useful for more than one part. A long diagonal piece can fall across the forehead without a dryer. Try the front from both directions if you want to change the part between washes.
The long piece should still have room to tuck when it comes forward. Ask the stylist to let you push it back yourself before the trim ends.
That shows how much it depends on a brush. The longer front can still sit softly near the brow with a part in place.
14. Chin-length shag with soft edge

Look for the curls or waves that already bend at the cheek. Those can give the shag its shape with a little length left below them.
Go easy on the shortest pieces if the bottom edge looks sparse. A looser outline can still show movement without splitting the ends. You can leave the back loose while you reset the shortest strands.
A few layers let a bend lift at the sides. Shorten the layers before the ends if you want the cut to keep a clear outline.
15. Medium cut with internal layers

Take bulk from the heaviest area and keep the edge at the shoulders. Have the stylist show what happens when you gather it at the neck.
Move the hair over one shoulder during the consultation so you can point to the spot that feels thick. Short layers under the surface may take weight from that area.
If your hair gets broader as it dries, check from the side before trimming the long layer again. A solid line at the bottom makes the cut easier to check from behind.
16. Side-parted curly crop
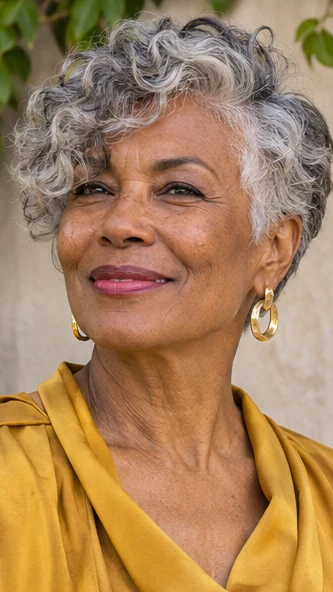
Create the part while the hair is wet, then leave the curl groups alone. Small adjustments after drying can help preserve the shape.
Use the part to decide where the larger curl groups can fall. Leave enough at the fuller temple to put your glasses on without moving the whole side.
If a dry front strand settles over your eye, wet that one piece and guide it back before reaching for more styling product. Let the bigger curl groups stay together if a part shift exposes more scalp.
17. Pushed-back wavy crop

Smooth the front back with a little water. Upkeep cue. Leave the crown untouched if it already has a bend that keeps it off the face. If the roots near your forehead won’t stay back when wet, use a small clip until they dry.
Leave the sides loose while you test it. The cut can follow the bend at the crown without relying on you to push back every strand beside the ear. Tuck the shorter side before you choose how much lift to leave at the front.
18. Close crop with a round nape
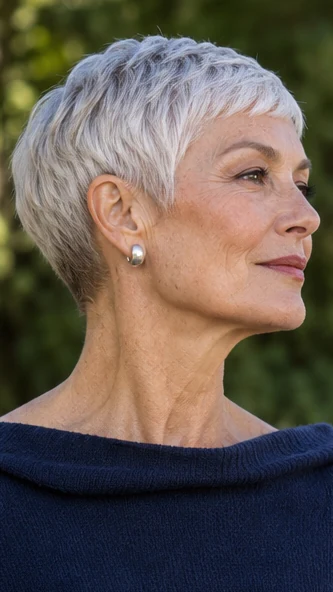
Look at the nape in a hand mirror with your head upright. A rounded line sits close without showing a sharp edge where the hair turns.
If you wear a scarf most days, ask how high the shortest area can go without losing the line you like from the side.
Take your glasses off before you check how the sideburn looks on its own. Choose a nape shape that will grow out softly. Ask for the sideburns to stop where they will sit clear of your frames.
19. Air-dried low-layer lob

Keep the longest pieces away from the ribs of a collar. If the ends flip where they touch clothing, try the length a little higher. Let the length settle with your normal shirt on before you say how short you want it.
The side near the part may flick more than the other when it reaches the collar. Leave enough weight in the last inch if you want the perimeter to stay visible. A light towel can help you see the edge without stretching it straight.
20. Short cut with a long ear tuck

Leave the front long enough to handle with damp hands. Tuck it before it dries if you want to wear it behind the ear.
Set the tuck where your glasses are going to sit. The side should fit behind the ear without hiding the shorter part of the cut.
If the other side dries away from the cheek naturally, let that bend show and keep a little length around the temple for windy days. Slip the frame arm in after the tuck and make sure nothing catches.
21. Barely layered medium curls

Preserve the longest dry curls at the perimeter. Ask the stylist to shorten the areas that feel heavy while leaving a few curl groups untouched.
Let the curl groups stay together as they dry so you can see the fullest area. A few shorter interior pieces can reduce the width there while the ends stay long enough to gather.
Check which ones spring up most before asking your stylist to take more from the bottom. The shortest curl can sit higher without leaving an uneven edge at the collar.
For more ideas, see the guide to short haircuts for fine hair.
Further reading. Stylist guidance on layers and texture.
The portraits are AI-generated illustrations of the featured looks.