21 Haircuts for Women Over 60 With Round Faces
Look at the line you want the haircut to draw. A short crop can show your temples and a long bob can leave a line well below your cheek.
Face shape is one piece of the decision. Use your part, your glasses and the way your hair dries to narrow the choices.
1. Angled jaw bob

Keep the back short and let the front reach a little below the jaw. See the angle in profile before deciding how far forward to leave it.
The line gets lighter at the back and travels forward near the cheek. Choose a version that gives you enough length to tuck if you wear glasses.
If that long point keeps brushing your mouth as you turn, set the edge a little closer to the jaw when the hair is dry. Leave the shortest side long enough to keep a narrow wisp beside the ear.
2. Side-swept pixie

Think about which side of your face you like to leave open. Keeping the ear on that side clear gives the long piece somewhere to lead the eye.
Let the fringe dry with your normal part and push one end aside if it falls across the top of your frames. Try a small clip while the longer front dries away from the open side.
Let one long piece pass across the forehead and leave the opposite ear open. The diagonal is stronger if the shorter side sits close.
3. Shoulder shag with a deep side part
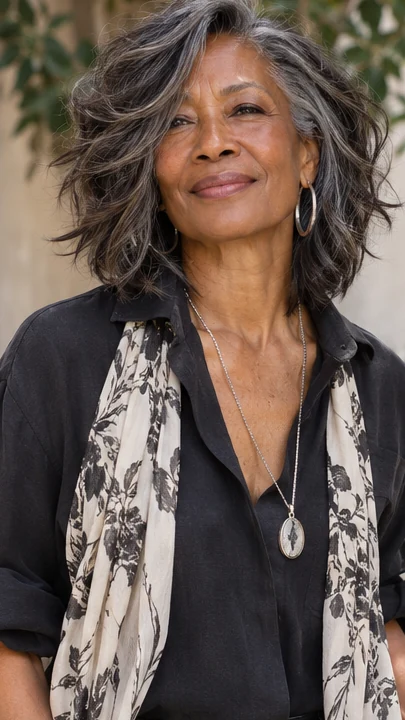
Put the fullest wave near the part, with the shortest pieces landing along the sides of the cheek. Ask for room to move the part later.
The longer edge of a shag can sit close to the shoulder while the top stays loose. A side part spreads the waves out without needing a short bang.
Check where the fullest bend falls before adding layers. If you tuck one side, the other can still sit along the cheek. Let the layer nearest your mouth dry at the same part you wear at home.
4. Straight collarbone lob
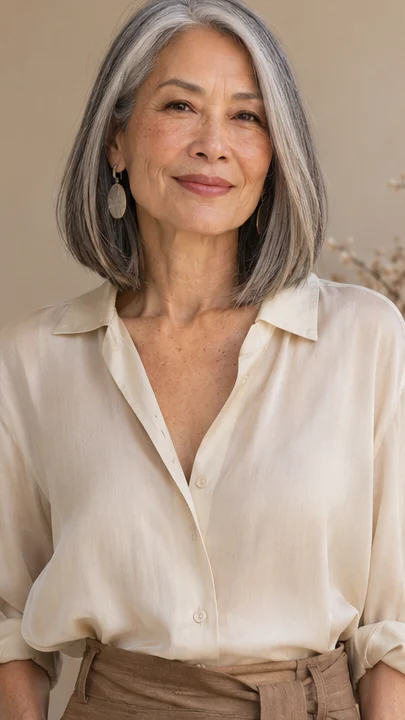
A clean collarbone edge lets the lengths fall in two vertical lines. Choose a length that clears your coat so one side doesn’t flick higher.
Watch the ends against the jacket you wear most. The straight shape reads clearly when the hair lies below where the cheek curves out.
If you like your hair behind one ear, keep enough length there that the line still looks even once you let both sides fall. The longer sides can still give you a clear shape with the back tucked away.
5. Long cheek sweep

Leave the fringe long enough to travel past the cheek. A side part gives it room to turn without lifting it off your forehead.
The sweep can sit long enough to take the look past a small fringe. If your hair already bends toward the cheek, let it follow that direction after a wash.
A side mirror gives you an idea of how much vertical space still shows between the end and the collar. Leave a little room above the cheekbone if you like to show that part of the cut.
6. Chin bob with an ear tuck

An ear tuck changes the line without taking anything away from the cut. Try the front view with both sides down first.
Leave the side you tuck long enough to hold in place, then check how much hair falls back if you wear glasses and move your head. See where the end sits when you rest your head on one hand.
Wear one side loose and tuck the other to open a diagonal across the face. Salon note. Keep the ends on the tucked side long enough to hold.
7. Wavy lob with a quiet part

Use a shallow side part if you want a change without giving too much hair to one side. Keep the bend visible below the cheek. Give the fuller side a spot to turn away from the cheek while the other lies close.
That narrow part may be enough to show a little difference from head-on. Avoid taking the sides shorter until you’ve seen how much the ends lift after drying. A looser bend can let the bottom keep its line even when the part moves.
8. Tapered crop with top length
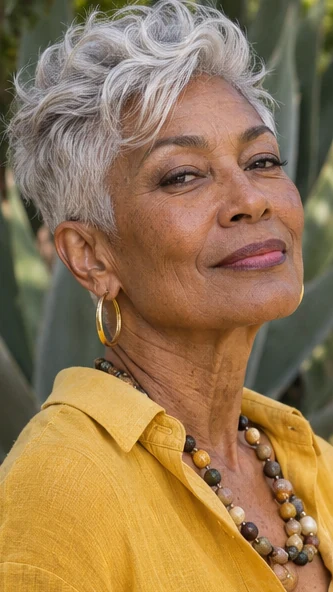
A close outline keeps the ears visible. Leave enough through the top for a bend you can brush back with damp hands.
The short sides give the top room to show. Decide how high you want the wave to sit when you’re looking straight ahead.
If your hair at the front falls over the brow, ask how much length you need to push it back with wet fingers. Use a small clip to teach the top where to go while it dries after your next wash.
9. Shoulder cut with long layers

Start the layers below the cheek if you prefer a piece that sweeps toward the shoulder. Check the front length after the ends dry.
Bring a rear photo if your hair fans out near the shoulder. The shape can still look soft beside the face while most of the length stays at the back.
Ask for the front layers to sit long enough to reach the side of your glasses when you tuck. Check the edge while you sit upright so your shoulder doesn’t push the layers up.
10. French bob with uneven fringe

Keep some of the fringe broad enough to see where it ends. A brow that shows in a couple of places gives this little bob more movement near the face.
Check the dry bang after parting it on the side you wear most, then shorten the pieces that actually sit low. You can still leave the sides loose if the front needs a little more space.
A short fringe leaves the eyes open. Tiny changes in length keep it from reading as a solid line across the forehead.
11. Soft U-shaped medium cut

The sides of a U-shaped edge can sit near the shoulder while the middle hangs lower. Daylight check. Ask to see the back as well as the front.
Let the longest part hang loose at the back and check where the sides land over your shirt. A shallow U can feel less wide there than a strong step between the back and front.
Keep the shorter sides long enough to gather at the neck if you wear a low tie. Ask where the first piece would land with both sides resting on your coat.
12. Long pixie with diagonal part

Choose which temple to expose before shortening the sides. A larger side can lie across the forehead or tuck back behind the ear. Sit upright and look at the part in the front mirror.
On the larger side, the fringe can fall as a single diagonal or break into a couple of pieces. Keep enough hair along that side to tuck it.
You’ll have a change in shape without needing to reset the whole top. Check the lower neckline when you turn to put on your jacket or scarf.
13. Asymmetrical crop
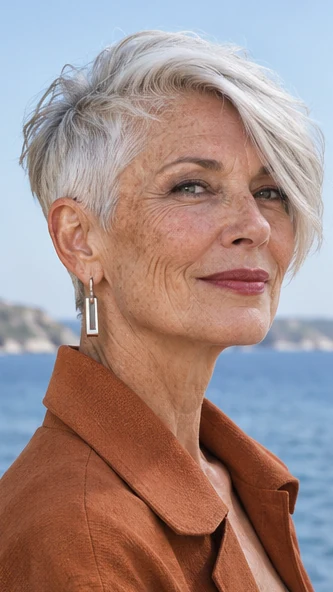
Leave a difference you can still see after one side is tucked. Use a photo of your own hair to decide which side to shorten. Leave the longer side alone until you decide how much of your ear you want in view.
Check the shape with your glasses off and on. If the profile still looks balanced after one side tucks, you can give the shorter side a little more space. A slower change between the two sides makes it easier to wear both loose.
14. Jaw-length curls with a side opening

Let the first curls separate where your hair usually parts. An open section at the brow can stay small while the rest of the bob keeps its width.
Check the nape after drying so you can see if the longest curls draw up enough to clear the collar. Leave one small group beside the ear if you want the open part to stay soft.
Let the curls separate near the part instead of brushing a panel smooth. Their shape can leave a small window at the forehead.
15. Feathered shoulder length

Let the layers turn outward at the shoulder and keep the rest of the cut calm. A wider brush can make the bend loose.
Try the outward bend over a plain collar before deciding how wide you want it to look. Use a wide brush if you want the bottom to lift just a little.
Leave the longer front pieces loose so they show along the side of the cheek. The outer bend has more room when the edge clears the fabric on your shoulder.
16. Chin-length bob with a long fringe

A cheek-length front piece brings movement to the side without requiring a short bang. Check that it still tucks behind your frames.
Decide where the ends of the fringe will land on both sides of your glasses. If one side tucks easily, let the other side have the longer bend.
Use your usual part once the hair dries so you can see if the shorter side still sits where you want. Hold one side loose while you check the other side in a hand mirror.
17. Short shag with an open temple

Leave the temple clear on one side and keep the soft pieces below the ear. Upkeep cue. A short nape leaves room for a scarf. Set the open area near an ear if you wear a long earring or a bold frame.
Keep the ends beneath it a little loose. A short nape can still show a few pieces from the front if you leave length on the other side. You can still show the texture across the nape if you leave a few ends longer.
18. Collarbone waves with a center part

A straight center part makes it easy to compare where the waves land. Let one side dry where it hangs and use a clip at the root of the other if it tends to flatten.
Keep the length long enough to turn near the collar instead of springing up beside the cheek. Ask to see where each bend lands after the hair has cooled and settled.
A center part gives both sides equal space in the mirror. Let the first bend settle on a dry section before choosing where to layer.
19. Brushed-back silver crop

Comb the front back while damp and see if it stays away from your eyes. This shape suits hair that already lifts off the forehead.
Let the roots cool after you’ve pushed the front back. Leave the shorter ends near the ear loose so the shape can soften a little from the front.
If the cut needs product to hold, use a small amount where the direction changes, then leave its lower edge alone. A long front section may still fall forward unless you set its direction while damp.
20. Short curly bob with a light nape

Take the back a little shorter to clear the neck, then let the dry curls set the edge. Keep room for the front pieces to coil.
Let the bottom curls hang once they’re dry before you take more off the nape. You can keep a soft edge around the cheek with just enough space to see the ear.
It helps to take a side photo when the curls sit in the shape you like. Leave a little extra in the curls near the ear so both sides remain visible.
21. Medium cut with blunt ends and a long side piece

Keep the bottom in a clear line. A single longer section beside the face can move across the cheek without breaking that shape.
The long front piece can work like a fringe when worn loose and disappear into an ear tuck when you want it out of the way. Check that the blunt edge still shows below it.
That keeps the long side piece from looking like a separate cut. See if both ends can stay behind your ears without opening up the bottom line.
For more ideas, see the guide to short haircuts for fine hair.
The portraits are AI-generated illustrations of the featured looks.